
Product Search
Product Categories
X100® X-Latch Repair Kits

- Repair Kit for the X100® X-Latch
- Repair Kit does NOT include the Steel Latch
- Read the X-Latch Warnings & Cautions before use
Quality Philosophy
Warnings and Cautions
Federal Specifications
Sales Conditions
| STOCK NUMBER | SIZE (TONS) | WEIGHT/PIECE (LBS) |
|---|---|---|
| XLAT5TRK | 5 | 0.07 |
| XLAT7TRK | 7 | 0.07 |
| XLAT15TRK | 15 | 0.09 |
| XLAT22-25TRK | 22-25 | 0.18 |
| XLAT30TRK | 30 | 0.32 |
| XLAT40TRK | 40 | 0.39 |
| XLAT55-70TRK | 55-70 | 0.64 |
| XLAT80-100TRK | 80-100 | 1.49 |
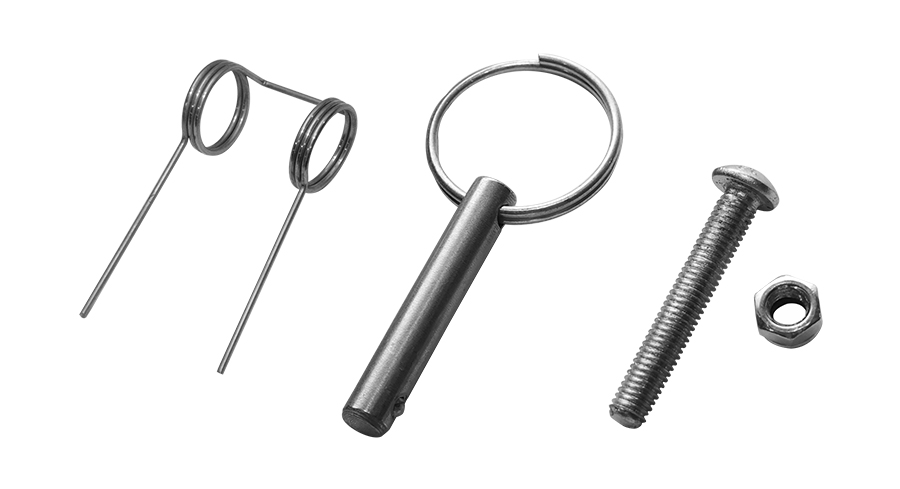
REPAIR KITS: For Latches 5 & 7 Ton

REPAIR KITS: For Latches 15 Ton or Greater
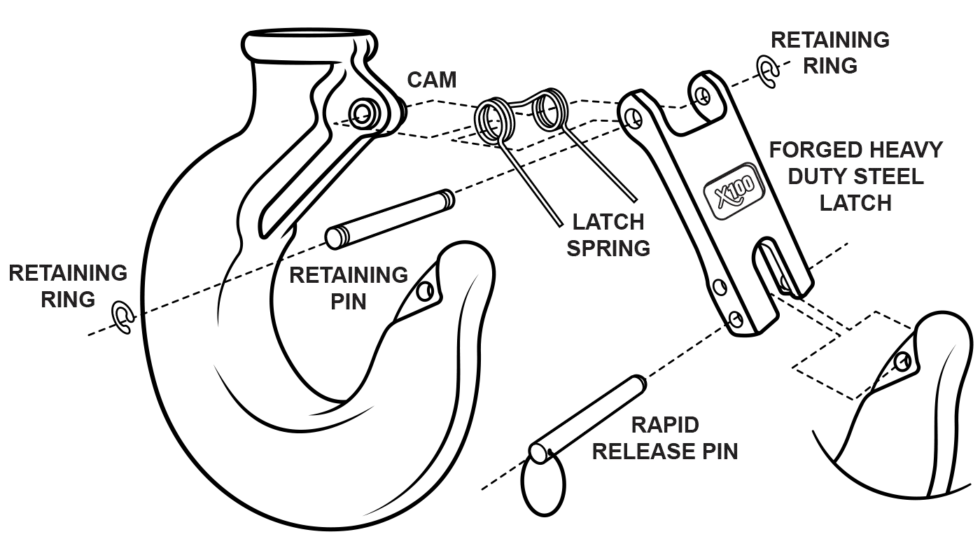
Remove old damaged latch kit and discard worn components. Retain Forged Heavy Duty Steel Latch.
Open the X100® X-Latch Repair Kit bag and remove and count the contents on a flat and level surface
The following items are enclosed:
X-Latch Repair Kits of 5 & 7 Ton:
2 Latch Springs (keep one for future use)
1 Bolt
2 Lock Nuts (keep one for future use)
1 Rapid Release Pin
X-Latch Repair Kits of 15 Ton or larger:
2 Latch Springs (keep one for future use)
1 Retaining Pin
4 Retaining Rings (keep two for future use)
1 Rapid Release Pin
FORGED HEAVY DUTY STEEL LATCH NOT INCLUDED
Place the Spring around the cam of the hook.
Place the front bottom end of the Latch into the notched tip of the hook.
Align the front top holes of the Latch to the cam holes, tucking the Spring into the underside of the Latch.
Insert the Retaining Pin or Bolt through the top of the Latch, through the Spring and cam holes.
Snap the Retaining Rings onto each side of the Retaining Pin, OR screw the Lock Nut onto the Bolt until hand tight.
NOTE: Be sure the Lock Nut is fully engaged with the bolt but do not overtighten.
Place the Rapid Release Pin into the bottom of the Latch.
WARNING: Prop 65: Products supplied by Advantage Sales & Supply Co. LLC may expose you to chemicals including Nickel, which is known to the State of California to cause cancer. For more information, visit to www.P65Warnings.ca.gov.


